This blog is in two parts. The first part explains what is needed to start with Terraform. This second part is to go one step further but still targets beginners.
You can find more in depth articles on Gruntwork blog and the Terraform documentation is also very good.
Table of contents
Terraform one step further
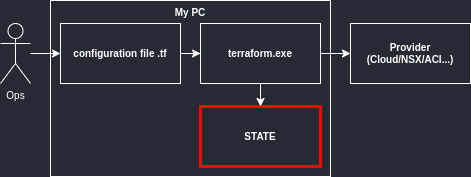
What happens in the background ?
When the configuration is applied for the first time, it creates a state file to keep track of what is managed by Terraform. The Terraform state file is a json file that you can read easily.
Click to display a state file
{
  "version": 4,
  "terraform_version": "1.0.0",
  "serial": 5,
  "lineage": "177474d1-df80-f405-45d1-c3a6b043b4b5",
  "outputs": {},
  "resources": [
    {
      "mode": "managed",
      "type": "aws_vpc",
      "name": "netmemo",
      "provider": "provider[\"registry.terraform.io/hashicorp/aws\"]",
      "instances": [
        {
          "schema_version": 1,
          "attributes": {
            "arn": "arn:aws:ec2:us-east-2:919821450090:vpc/vpc-0c53f54e268772136",
            "assign_generated_ipv6_cidr_block": false,
            "cidr_block": "10.0.0.0/16",
            "default_network_acl_id": "acl-0856dd4ead6188e7c",
            "default_route_table_id": "rtb-02f6f1824fca2ea83",
            "default_security_group_id": "sg-082ca88831aa7e0e5",
            "dhcp_options_id": "dopt-b98bcbd2",
            "enable_classiclink": null,
            "enable_classiclink_dns_support": null,
            "enable_dns_hostnames": false,
            "enable_dns_support": true,
            "id": "vpc-0c53f54e268772136",
            "instance_tenancy": "default",
            "ipv6_association_id": "",
            "ipv6_cidr_block": "",
            "main_route_table_id": "rtb-02f6f1824fca2ea83",
            "owner_id": "919821450090",
            "tags": null,
            "tags_all": {}
          },
          "sensitive_attributes": [],
          "private": "eyJzY2hlbWFfdmVyc2lvbiI6IjEifQ=="
        }
      ]
    }
  ]
}
What happens if we modify the object on GUI ?
The configuration file is the intended configuration, it becomes the source of truth.
The resource is now managed by Terraform.
If you apply the configuration again, it will compare it to the state file we have. If the resource is managed by Terraform it will implement the delta to make the production back as it was intended in the configuration file.
Click to see what happens if you change the name of a VPC from the GUI and try to apply the configuration through Terraform again
aws_vpc.netmemo: Refreshing state... [id=vpc-0fdab0a3c74e847ec]

Note: Objects have changed outside of Terraform

Terraform detected the following changes made outside of Terraform since the last "terraform apply":

  # aws_vpc.netmemo has been changed
  ~ resource "aws_vpc" "netmemo" {
        id                               = "vpc-0fdab0a3c74e847ec"
      + tags                             = {
          + "Name" = "netmemo-vpc"
        }
      ~ tags_all                         = {
          + "Name" = "netmemo-vpc"
        }
        # (12 unchanged attributes hidden)
    }

Unless you have made equivalent changes to your configuration, or ignored the relevant attributes using ignore_changes, the following plan may include actions to undo or respond to these changes.

──────────────────────────────────────────────────────────────────────────────────────────────────────────────────────────────────────────────────────────────────────────────────────────────────────

Terraform used the selected providers to generate the following execution plan. Resource actions are indicated with the following symbols:
  ~ update in-place

Terraform will perform the following actions:

  # aws_vpc.netmemo will be updated in-place
  ~ resource "aws_vpc" "netmemo" {
        id                               = "vpc-0fdab0a3c74e847ec"
      ~ tags                             = {
          - "Name" = "netmemo-vpc" -> null
        }
      ~ tags_all                         = {
          - "Name" = "netmemo-vpc"
        } -> (known after apply)
        # (12 unchanged attributes hidden)
    }

Plan: 0 to add, 1 to change, 0 to destroy.
How do I remove configuration ?
- If you want to delete a specific resource, you just need to remove it from the Terraform configuration file. Terraform will take care of all the steps to delete it. It manages all the steps for you.
- It is the difference between a declarative approach and an imperative/procedural approach where you need to specify all the steps you need to do.
Click to see what happens when you destroy a configuration
Terraform will perform the following actions:

  # aws_vpc.netmemo will be destroyed
  - resource "aws_vpc" "netmemo" {
      - arn                              = "arn:aws:ec2:us-east-2:919821450090:vpc/vpc-0fdab0a3c74e847ec" -> null
      - assign_generated_ipv6_cidr_block = false -> null
      - cidr_block                       = "10.0.0.0/16" -> null
      - default_network_acl_id           = "acl-0e677ba2378eaf56e" -> null
      - default_route_table_id           = "rtb-0ecb3bbec21918662" -> null
      - default_security_group_id        = "sg-0c41be3848fca4e83" -> null
      - dhcp_options_id                  = "dopt-b98bcbd2" -> null
      - enable_dns_hostnames             = false -> null
      - enable_dns_support               = true -> null
      - id                               = "vpc-0fdab0a3c74e847ec" -> null
      - instance_tenancy                 = "default" -> null
      - main_route_table_id              = "rtb-0ecb3bbec21918662" -> null
      - owner_id                         = "919821450090" -> null
      - tags                             = {
          - "Name" = "netmemo-vpc"
        } -> null
      - tags_all                         = {
          - "Name" = "netmemo-vpc"
        } -> null
    }

Plan: 0 to add, 0 to change, 1 to destroy.

Changes to Outputs:
  - test-output = "iam testing" -> null

Do you really want to destroy all resources?
  Terraform will destroy all your managed infrastructure, as shown above.
  There is no undo. Only 'yes' will be accepted to confirm.

  Enter a value: yes

aws_vpc.netmemo: Destroying... [id=vpc-0fdab0a3c74e847ec]
aws_vpc.netmemo: Destruction complete after 1s

Destroy complete! Resources: 1 destroyed.
What can we find in the state file ?
There are 3 types of objects in the state file:
| Object | Mode | Description |
|---|---|---|
| Resource | Managed | What we create and manage through our Terraform script |
| Datasource | Data | import production object and work with their attributes. For instance, import a VPC that is not managed by Terraform and use the vpc_id to assign a subnet |
| Output | N/A | Variables |
Click to see a resource
{
    "mode": "managed",
    "type": "aws_vpc",
    "name": "netmemo",
    "provider": "provider[\"registry.terraform.io/hashicorp/aws\"]",
    "instances": [
      {
        "schema_version": 1,
        "attributes": {
          <snip> ..... <snip>
        },
        "sensitive_attributes": [],
        "private": "*****fdmVyc2lvbiI6IjEifQ=="
      }
    ]
}
Click to see a datasource
    {
      "mode": "data",
      "type": "aws_iam_policy",
      "name": "vpcpolicy",
      "provider": "provider[\"registry.terraform.io/hashicorp/aws\"]",
      "instances": [
        {
          "schema_version": 0,
          "attributes": {
            <snip> ..... <snip>
          },
          "sensitive_attributes": []
        }
      ]
    }
Click to see an output
  "outputs": {
    "test-output": {
      "value": "iam testint",
      "type": "string"
    }
  }
Terraform components
Variables
Outputs: This will store variables in the output section of the state file. It will also be displayed at the screen terminal when the command “plan” and “apply” are executed. Only output variables can be accessed from other Terraform modules.
Locals: Allow to define named values that you can refer to in your configuration. It helps to do variable manipulation or substitution to make the code more readable. Use local values only in moderation, in situation where a single value or result is used in many places and that value is likely to be changed in future. The ability to easily change the value in a central place is the key advantage of local values.
locals {
# Ids for multiple sets of EC2 instances, merged together
instance_ids = concat(aws_instance.blue.*.id, aws_instance.green.*.id)
}
Inputs: It serves as parameters for a Terraform module.
Comparing to traditional programming language Output values are like function return values. Local values are like a function’s temporary local variables. Input variables are like function arguments
Files
├─ main.tf
├─ provider.tf
├─ variables.tf
├─ outputs.tf
├─ terraform.tfvars
├─ terraform.tfstate
- .tf
The main file can be split into different files for the readers’ convenience. The name of the .tf file can be anything. Most of the time we find:
| File | Description |
|---|---|
| main.tf | Resources definition |
| provider.tf | Provider definition |
| variable.tf | Variable declaration (name + type) |
| outputs.tf | outputs variables |
terraform.tfvars
It contains the input variables definitions (value). This is used with “module” where we need different variables per infrastructure. Otherwise, the variable definition can be embedded in the default section of the variable declaration in the Terraform configuration file.terraform.tfstate
To store the current state of the Terraform managed infrastructure.
Variable declaration and definition
 #declaration + type
 variable "cidr" {
     type = string
 }

 #value
 cidr = "10.0.0.0/24"
Commands
terraform init : Download the providers.
terraform plan : Allow to dissociate the “plan” from the “apply”. It compares the previous state and the intended config and tells you what it will plan to do to make the production as intended. With this command you can save the plan to directly apply it with the apply command when you are ready.
terraform show : Display the current state file or the plan file created with the plan command.
terraform apply : Push the configuration to production.
terraform destroy : Delete all the configuration. It can be useful in CI/CD environment when we want to test things and destroy afterwards.
Modules

Root module.
This is the main program that will create the infrastructure.Child module.
This is the module called from the root module. It allows to externalize repeatable code. By centralizing the code, it becomes more manageable.
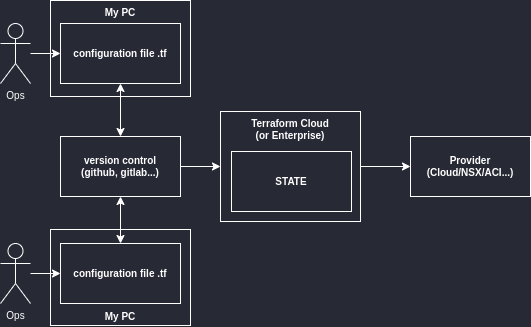
Scaling
Workspaces
- Workspaces
- Shared storage for state files : Access to all members of the team
- Locking state files : Prevent concurrent modification
- Isolating state files : Several environments and variables
- Shared storage for state files : Access to all members of the team
- Terraform Cloud/Enterprise
This is an infrastructure component SaaS for Terraform Cloud and on-premises server for Terraform Enterprise. This software allows to manage workspaces, variables, state file locking, password and provide API to interface Terraform with other software like Github.
DRY
- Keep your code DRY (Don’t Repeat Yourself)
for_each : Allow to loop over a resource to create it several times according to variables that you define in your variable.tf file.
Without for_each
Every time you add a subnet you need to create an entire block of resources.
resource “aws_subnet” “subnet1” {
   cidr_block	= “10.0.1.0/24”
   vpc_id	= “myvpcid”
}

resource “aws_subnet” “subnet2” {
   cidr_block	= “10.0.2.0/24”
   vpc_id	= “myvpcid”
}

resource “aws_subnet” “subnet13” {
   cidr_block	= “10.0.3.0/24”
   vpc_id	= “myvpcid”
}

resource “aws_subnet” “subnet4” {
   cidr_block	= “10.0.4.0/24”
   vpc_id	= “myvpcid”
}

resource “aws_subnet” “subnet5” {
   cidr_block	= “10.0.5.0/24”
   vpc_id	= “myvpcid”
}
With for_each
Every time you add a subnet you need add a line in the variable.
#variable declaration
variable “setofsubnet” {
    type = set(string)
}

#variable definition
setofsubnet = [
   “10.0.1.0/24”,
   “10.0.2.0/24”,
   “10.0.3.0/24”,
   “10.0.4.0/24”,
   “10.0.5.0/24”
]

#resource creation
resource “aws_subnet” “main-subnet” {
   for_each = var.listofsubnet
   cidr_block = each.key
   vpc_id = “myvpcid”
}
You can find very good tips around loops on the Gruntwork blog.